
Reviewing Your Sensitive Data Scan
You can do this by running a special review program, and marking the files that the scan finds according to your judgement. If all the suspect numbers in a file are neither Social Security numbers, credit card numbers, nor bank account numbers, you will be able to mark it so that future scans will skip it. If a file does contain one or more sensitive numbers, you will need to edit them out or remove the file from your account. If you do not need the file any more, you can simply delete it, or you can download it to a personal (not owned by Cornell) machine, or store it on a CD or other removable media. (And then delete it.) If you have a lot of these files, you can use the "quarantine" feature to move them to one folder for easier downloading and deletion.
Quick Summary
What you need to do is this. Details are explained below.
- Run the review program.
- Mark the files appropriately.
- Mark false positives ignore.
- Mark files you no longer need as delete.
- Mark files you want to download as quarantine.
- Mark text files and mailboxes that you want to edit as redact.
- Do the actions on the marked files.
- Quarantine the files marked quarantine.
- Redact the files marked redact.
- Download any files you marked for deletion and want to keep.
- Delete the files marked delete.
- Do a Save All and exit the program.
- Download or save to removable media the files in the quarantine folder.
- Manually delete the quarantine folder. Be sure to empty the trash!
- Inform the systems staff that you are done.
Run the Review Program
In your Applications folder there should be an item labled Find_SSNs_Review.command. Double-click this.
If a password window opens, enter the password that you used when you ran the scan.
Note that if the list of results is large, it will take some time for the window to open. Also, you may need to enlarge the window in order to see the information. Once running, you will see a window like this:
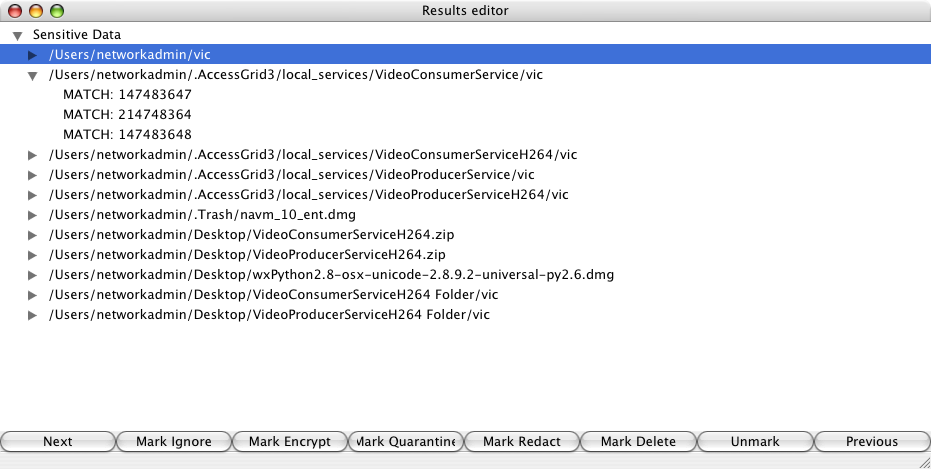
The window will show a list of files, and for each file, a list of matches. For many types of files, such as text files, it will also show the context in which the match is found. You can expand or collapse the information displayed by clicking on the little triangles.
Mark Files
The buttons at the bottom affect the highlighted file, as follows:
- Next moves to the next file.
- Mark Ignore marks the current file as a false positive, and moves to the next file.
- Mark Encrypt marks the file for encryption, and moves to the next. We do not recommend using this option since College policy is not to have sensitive data on machines, even if it is encrypted. If for some reason you want to use this function, contact the systems staff for more information first.
- Mark Quarantine marks the file to be moved to a special directory that you will designate later. This can be useful for collecting all the files that have sensitive data so that you can download them as a group. After downloading, you will need to delete those files manually.
- Mark Redact marks a file for "redaction," or automatic editing to remove the sensitive numbers. This should only be used on text files and mailboxes.
- Mark Delete marks a file for deletion.
- Unmark removes the mark on a file.
- Previous goes to the previous file.
Act on the Marks
The Actions menu at the top does the things specified by the marks.
- Quarantine files marked as quarantine prompts you to choose a directory, then moves all the files that you marked quarantine into that directory. File name conflicts are resolved by adding a random number to the beginning of one file's name.
- Redact files marked as redact will go through the files that you marked redact and show you a list of the numbers found in each. Uncheck any numbers that are not sensitive, and click OK, or click Cancel to skip that file completely. After a file is redacted, the program checks that the redacted file is the same length as the original; if it is not, the original file is not replaced and an error message is printed to the terminal window. If you encounter one of these errors, contact the systems staff for assistance.
- Delete files marked as delete will delete permanently the files you have marked delete.
Finishing Up
When you are done, save the information by going to the File menu and selecting Save All. This will save your marks and ensure that files you marked Ignore will not be scanned again. Then select Exit.
You can also do this before you are done if you want to take a break and resume work later.
If you have quarantined any files, you need to copy them from the quarantine folder to a CD or DVD, and then delete them.
Finally, run the Disk Utility (in the Utilities folder) and erase the free disk space. This will ensure that no-one can recover the sensitive data that was in the files you deleted. To do this:
- In Disk Utility, select the disk that you just cleaned.
- Click Erase, then click the Erase Free Space button.
- Select the "zero out" option, then click Erase.